|
BUILDING BETTER BRUSH PILES - Part 2 by Dr. Bruce Gabrielson I started this series describing various types of brush piles in my pen. This article covers another type of common pile I use. Note that I live in an area with lots of trees and heavy brush. I have owls around here, so I need good cover to keep them from getting my rabbits. If you've removed all your trees because of hawk or owl problems, you will always need to let your strips grow high and provide solid covered areas for the rabbits to congregate.
Lean-to Brush Pile
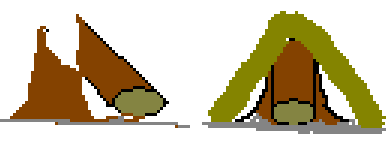
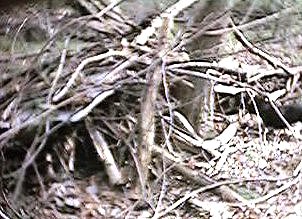
This is probably the easiest and quickest brush pile to build. It isn't real big so many can be spotted around a starting pen. All you really do is lean a log up against a tree about 2 ½ feet above the ground and then lean smaller log sections against each side like a tent. I usually put a small piece of plywood or aluminum under the logs and brush along one side of the lean-to for rain cover. The drawing in Figure 1 and picture (Figure 2) show a typical design.
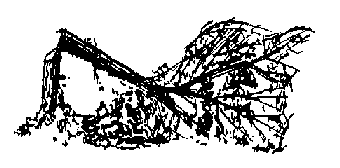
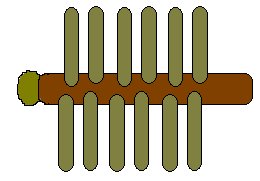
Long Lean-to Brush Piles This is an interesting and easy to build brush pile. To build it you need to find a group of smaller diameter trees growing close together. Start by cutting a notch about 1 –1 ½ ft above the ground and then push the tree over as shown in Figure 3. This type of cut will allow the tree to bend and fall, but not all the way to the ground on one end. If possible, when you can cut 2-3 trees cut close together, you will create several natural pockets under the branches holding the brush pile up. Lean side branches or logs against this base as shown in Figure 4 to extend the covered areas out along the trunk.
There are a few things that need to be considered with this type of brush pile. 1. First, there isn’t a lot of material in the thick top (upper) sections. You will probably need to place some additional branches on top of the primary support branches to ensure plenty of thickness. 2. The pile will get too high and fall over from its own weight unless you place a couple of heavier cross logs on top as it is built. 3. If your bottom trees are longer than 15 feet, cut them off at that length and put the cut sections back onto the pile. 4. The cross log under the bottom section holding up the pile should be thick, at least 8-10 inches in diameter. 5. After the leaves have a chance to dry and the pile ages a little, it will appear to thin out. Add some additional branches on top in a couple of weeks.
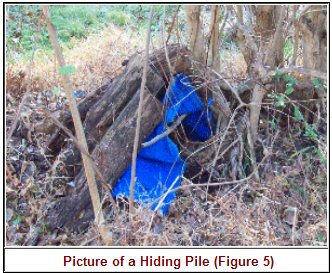
The pile at left (Figure 5) is primarily used by my rabbits for hiding and not as a permanent home. Dogs can get through it without much difficulty, but their short delay will give the rabbit time to leave the area. Towards fall the pile will break down further providing little direct cover and will need to be replenished or moved each spring. I often get briers or other small trees growing through the pile and the trees can be cut in early spring. When this happens, my pile becomes permanent. Also, I often locate my rabbit feeders close to this type of brush pile. Note that the small piece of blue tarp is used to keep water out of the inside area. One note about this type of pile, it seems to best for me to locate many of these piles just inside the path around my starting pen fence. I've located many around the perimeter, and these seem to be some of the best places for me to easily jump rabbits. As I walk the perimeter, I can hit the pile at one end with a stick and out will jump a rabbit at the far end. Remember that these piles are more long then wide so rabbits tend to move through them just like they would a feeder strip in a traditional running ground. The Heavier Version
When I don’t have small trees to build a pile from, my next option, provided I have larger trees, is to build a permanent pile from a larger tree. In this case, I’ll sometimes use a tree blown down during a storm as a start, or I’ll try to choose a tree at least 12” or thicker in an area with fewer surrounding trees that could be knocked over. Cut the tree as near the base as possible, oriented so it falls about where you want your pile. Leave the main trunk about 15-20 feet long, cutting larger trunk sections and branches past your first section short enough that you can move them. You need to also cut a notch about 1 foot across in the middle of your main trunk so rabbits can get to each side of the trunk. Arrange other logs and heavier branches at intervals as shown in Figure 6, trying to keep from cutting as many branches as you can in the process. When all the heavier log sections are arranged, cover the entire structure with the thinner branches you cut from the tree’s top. These branches are placed length-wise along the entire top of the assembly, trying to cover the inner logs as much as possible. Shorter branches are also leaned against the heavy trunks along with the angled short logs. This type of brush pile is semi-permanent and will last several years despite your weather and water conditions. The pile shown on-end in Figure 7 started as a blown down tree (the dark trunk underneath the pile). I cut the trunk about 15 feet from the roots and then rolled the additional logs sections I cut back alongside of the main trunk. As you can see, I've added to the pile with some newly cut trees. They seem to grow on a regular basis around the edges of this pile. Also, it's constantly wet around the bottom of the pile from rain run-off but has been popular with my rabbits for about 6 years. The under logs have started to rot some now but still hold their shape. Each spring I cut a few new small trees down and build up the top of the existing pile. Also, after the first year, blackberries and vines started to grow around the pile near the root section, and this helps keep the existing cover both close and dense. I should also mention that the roots of this tree (back from the pile itself) stick up in the air about 4 feet, and I’ve found a permanent rabbit nesting burrow dug into the dirt and root structure there (see Figure 8). 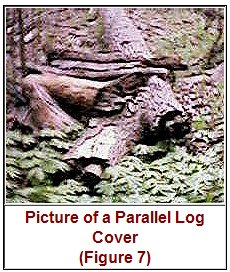
Parallel Log Cover This isn't really a brush pile but more of a covered area for rabbits. I had a large tree go down and wanted to use it for a brush pile but there wasn't any convenient brush or small trees around. Also the tree was long and crossed one of my paths. Basically what I did is cut the section of trunk out of my path and placed it next to the main trunk. Then I put several branches and shorter logs between the main logs as shown. Rabbits don't stay there on a regular basis but I noticed that they like to run under the branches and then hid until the hounds get close enough to flush them again. One of my bigger current piles started out as a simple covered area like this.
Hollow Log Cover
I have an abundant supply of hollow logs in my pen. I didn't find them immediately but once I cut the
trees down, there they were. What i have done is cut these logs up into 3 to 4 foot sections and then
spread them out in my brush piles. So long as the entrance to these hollow areas aren't completely open
for a dog to crawl in to, they seem to be the most popular nesting areas of all my rabbit hiding spots.
One caution is that you need to be careful snakes don't start to den up in these places.
Refreshing in
the Early Summer
Regardless of the type of pile you build in the early
spring, by late May it has started to look a little thin. By that time of year, I have another problem in my pen,
low branches and new trees have started to grow into my paths.
Another easy solution for me, cut the low branches and trees and put
them on top of the nearby piles (see Figure 9). At
this time of year the leaves are thick and will act as a good canopy for
the piles. |