|
BUILDING MODULAR by Dr. Bruce Gabrielson Several Beaglers have asked me recently to provide information on how I build my kennel boxes and individual kennels. This article will discuss the kennels I use and the lessons I've learned over many years of constructing them. Background Everyone has an opinion on the type of kennel they like. Some Beaglers like on-the-ground concrete floor kennels with individual insulated boxes, some like wire-bottom multi-hound kennels, and some like the individual take apart (modular) kennels. I'm partial to the latter, both because it's getting harder for me to repair and/or move kennels as I've gotten older, and also because of the wear and tear on my kennels from the sometimes rough winters (and rainy hot summers) we get. I also have the problem of wear and tear due to the large number of hounds that go through here. One additional problem when you have lots of hounds is that you need some kennels that can be isolated or serve as whelping pens and puppy pens when required. I once had to keep a hound totally quiet and isolated for a month after a severe heartworm treatment. This was a difficult job with all my existing kennels in one location and required me to actually build another kennel. Rather then have kennels sit idle part of the time, I prefer a kennel that can be used for pups, sick hounds or whatever else is needed. Let's summarize some typical kennel needs from what's implied in the paragraphs above based on my particular requirements:
Floor Approaches Before I talk about anything else, we need to discuss kennel floors. Permanent floors like concrete can't be moved but kennels that aren't attached to the concrete can. Dirt flooring simply means pulling up a chain and then moving to another spot. To start with, I've long given up on ground, gravel, or concrete floor kennels. Anyone who has had an infestation of whip worms one time will never go that route again. I kept having re-infestations for a couple of years until I simply quit walking my hounds over the area where I had kept them on the ground. Even if you have bigger hounds, at least get them on concrete and spray bleach on the floor regularly. All my kennels are either welded wire, pressed steel, or tight steel linked bottoms between 2 feet and 3 feet above the ground. Welded wire is probably the most common flooring material for Beagle kennels. Beagles are normally in the 30 to 45 pound range, a weight that welded wire can support for a limited time. The two major problems with hounds on welded wire are foot splaying and cleaning. I use 1" x 2" mesh (1/2" mesh in whelping pens) welded wire on some kennels. If you must use welded wire, there are some things you need to do to prevent foot splaying. These will be discussed below. You also need to ensure the wire holds up for a reasonable period of time before it must be replaced. First Lesson:
Heavy Use Heavy use means using treated wood that won't rot, inspecting and repairing wood, roofing material, wire and door hinges on a weekly basis, and regularly spraying with bleach to dissinfect. I constantly move visiting hounds around primarily to control barkers. Some hounds do not get along with other hounds in a kennel environment. When you have two hounds adjacent and they are fed at the same time, it is very likely one or both will bark for hours at each other. Another problem is young pups for the starting pen. If they have never been away from home, never been kenneled or kenneled with strange hounds, or never been kept by themselves, they will jump around in the pen or pace a lot and sometimes bark, wine and howl for days on end. They will also chew on the wood, shit in their boxes, tip over food pans, and do just about everything else you don't want any part of. You also don't want a contagious or wormy hound passing along it's problems to other kenneled hounds. This means you need to bleach before and after you get a new hound, plus you need to insist on shots and worm everything that comes into your kennel. Next lesson:
All these things cause wear and tear on your pens and will result in way more repair work then you would endure with just a few of your own hounds. In my case, it means I need pens that I can withstand punishment and can be repaired quickly and easily. Light and Modular Modular to me usually implies lighter and easier to handle. This means easier then a multi-hound kennel would be to fix and easy to take apart. This was a lesson it took me many years to learn. I've definitely learned a few things I'd like to pass along. When I first made my kennels at home I was young and just wanted something off the ground with plenty of room for my hounds. I built big 2' by 4' boxes with flat lift up lids, and 6' welded wire runs. The kennels were each 4' high with four legs (one at each corner) holding them up. I framed using 2" x 4"s and �" waterproof plywood for the boxes. The first of many mistakes I made was nailing the wire floor on top of the bottom 4" by 6' run base with only one 2" x 4" placed down the middle for a brace. The floor lasted about two months, and I had to nearly take the kennel apart to replace the floor. Two of us would tip the kennel over, tear out and replace the floor, run a hose into the box to clean it, then move the hinges to another spot since by then the top cover screws had pulled out. These kennels got hot in the sun and were messy underneath, resulting in a decision to put an 8' high cover over all my kennels and concrete underneath the runs so they could be cleaned out easily. I will discuss more on covers later in this paper. Next two lessons:
When I moved to my first farm, only the lighter kennels could be transported. However, I was still young and wanted to build new kennels anyway. At the time I was thinking commercial type kennels that could handle many hounds. I was influenced by the kennels at local Beagle Clubs that often were usually built in long lines with easy vehicle access. I also wanted a couple of very large kennels that could handle whole litters of pups or even an occasional coonhound if necessary. The first thing I immediately learned is that unless you have pressed steel floors, don't put coonhounds on wire. They are big and rugged and really need to be on concrete. Leave the wire bottom kennels for your Beagles. Next lesson:
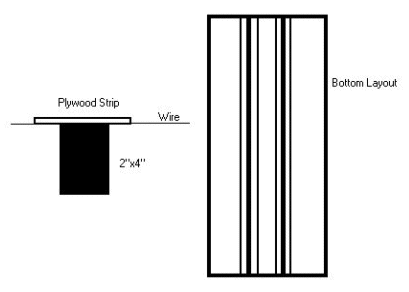
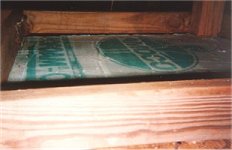
My problem with the bigger kennels was making sure I could fix the bottom easily when it wore out. Since I didn't have enough pressed steel or tight steel linked bottoms, I was forced to use the welded wire approach. By then I was tired of replacing floors after a short time, and I had been experimenting. The problem with welded wire is that the welds break from constant usage by dogs. By providing a solid piece of wood to walk on, what this floor design does is tend to limit where the dogs like to walk. It also provides a clamp on the wire itself from several directions, thus limiting the amount of movement the actual welds are exposed to. Couple of things I learned to make things easier based on how my wire was wearing out. Nail the wire to the bottom of an open run (no cross braces) using wire staples. Then across the bottom, nail a couple of 2"x2" or 2" x 4" treated braces flush with the wire as shown below. On the top of the wire (inside the kennel run) screw a 3" wide strip of �" plywood to the brace over the length of the run. You will find that the plywood is easily cleaned with a hoe if needed and the screws won't come loose with constant walking. Now nail a layer around the outside edge of the run using 2"x2" s. The approach is shown in Figure 1.
Next lessons:
Boxes Another thing I tried after fixing the top of the box whenever I tipped it over was that I was better off just screwing it down and then unscrewing it when I had to get in. My boxes have heavy felt on top for rain and snow protection, and this made them heavy anyway. However, I had the problem with heavy snow build-up on top during the winter, plus when I insulated under the boxes with foam rubber or Styrofoam, it made the kennels very heavy to turn over. This also didn't work well when I had to clean the inside of the box or replace a side panel. I'll discuss more on boxes later. Separation of Functions After a few years of getting help every time I wanted to move a kennel, tip one over to fix the bottom, dealing with needing to replace the inner wall between individual boxes when hounds would finally scratch through them, and having to replace interior wire or wood on the sides of the run when it rusted through or was chewed, I finally learned my final lessons. Never make a kennel larger then two runs and if you want less work over the long term, you really need to make it modular stupid.
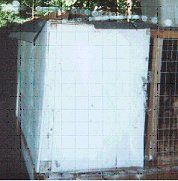
Notice the pictures in Figures 2 and 3. Here is a typical example of my newer kennels. Figure 2 is from the back side showing where the box and cage attach. My older kennels are heavy insulated and will hold 4 hounds easily. The problem is that they are also tremendously heavy (virtually can't moved), require several people to tip them over and then tip them back, need all the wire bottoms fixed when turned over, and often break the legs off when tipping because of the weight. They will be cut up and burned before much longer as each finally falls down.
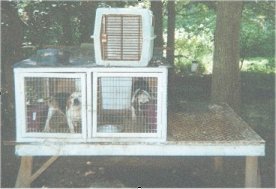
Figure 3 shows my modular kennel with a steel
linked bottom from
the front. Welded wire would work just as well. Note in Figure 4 I've taken the
single box and run from one side so you can see just the two box section and the
bottom of the three run kennel. This kennel will hold three hounds easily, is
built in six separate parts, and can be broken down completely by myself to
repair or move in a few minutes. It consists of a bottom stand made from
waterproof treated 2" x 4"s, a one piece steel linked bottom panel, a double box
and a single box sitting side by side on top of the steel wire, and finally a
single and double wire run section. I use a small piece of wire to keep the
boxes and
Next Lessons
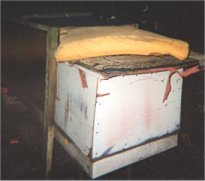
The Modular Design Shown below in Figure 5 is a drawing of my typical modular design. This is a single kennel design but a two kennel design can be easily derived. One item you might consider is if the kennel will be used for whelping. If so I would only use the single kennel design, use �" square mesh for the wire bottom, and maybe make the run size shorter. Big and Little Things The entire kennel should be built from treated 2"x2" and 2"x4" boards using screws and wire braids for the wires rather then nails. Notice the slop on the box. The drawing is exaggerated a little. In reality I have only a slight slope, just enough to provide good water runoff. Because of rain or sun you should cover the outside of your box and run with roof felt. If it's hot and sun exposed, use white roof felt. I don't emphasize covering the sides of my runs since my kennels sit in a low protected area that isn't exposed to howling winds. The roof felt wears out in a couple of years and is easy to replace. However, it's a lot easier then replacing plywood covers when it does go. I put the roof felt right over the welded wire top and sides of my kennels. One thing not shown installed in the drawing is insulation. In many places winters are mild enough that you only need to insulate the bottom of your kennel box. Put the insulation in the space under the box inside the 2"x4" area. I use 3" thick foam rubber with plywood on top and bottom to enclose the space. I tried fiberglass but found it tends to break down with age. Foam lasts longer even if insects eat it.
You can also insulate the top and sides of the box as necessary. It may be heavy
but at least it can still be removed and put back by one person. Figures 5 and 6
show the insulation used for a modular designed kennel box and the space under
the box where it goes.
The final note about my kennels is that you need a piece of plywood under your feed pan and also in front of your box entrance. In some kennels with understanding Beagles I can use self feeders. However, in most I have feed pans. Beagles will sometimes pick up a piece of food and then carry it to a flat place to eat. They also tend to nose their food out of the pan, especially when they hear other hounds running or going to the field. Having a board under your pan will provide a much needed place for food to be eaten or kept from being wasted.
By the way, one other item about feed dropping under your kennels. I keep chickens around my kennels to clean the food up that drops and also keep bugs and rodents down. I haven't had a rat or even much of a fly problem in years. I also have a bug light in front of my kennels to cut down on these pests. Next lessons:
One final lesson I've learned is how high to make the bottom stand off the ground. My early kennel stands were always cut at 4 feet just because it was � a 2" x 4". I had plenty of room to get under a kennel if needed, but putting hounds into their kennels was always troublesome. Give your back a break. You should build your bottom stand so that it is convenient at waist high. Below is a summary of the lessons I've learned.
All articles are the copyrighted
property of the author |
 Next
lessons:
Next
lessons:
 wired
upper sections in place. Also, while not necessary lessons learned, I paint my
kennels for a couple of reasons:
wired
upper sections in place. Also, while not necessary lessons learned, I paint my
kennels for a couple of reasons:
 One big mistake sometimes still made with modular since it's easy to get at is
putting the welded wire flooring on top of the bottom support frame. I did it
once and then was reminded why my wire wore out quickly. Put it on the bottom.
You can then put the layer of support wood around the bottom and simply screw
the legs to the side of the frame (Figure 8). The wire will last much longer and
you will be much happier.
One big mistake sometimes still made with modular since it's easy to get at is
putting the welded wire flooring on top of the bottom support frame. I did it
once and then was reminded why my wire wore out quickly. Put it on the bottom.
You can then put the layer of support wood around the bottom and simply screw
the legs to the side of the frame (Figure 8). The wire will last much longer and
you will be much happier.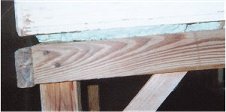 Another place hounds want a board is in front of their box. They like to lay out
and relax outside the box and you will find them there much of the time. I like
to have my plywood firmly placed in a location so it can be easily cleaned as
well as provide additional support to reduce wire vibrations.
Another place hounds want a board is in front of their box. They like to lay out
and relax outside the box and you will find them there much of the time. I like
to have my plywood firmly placed in a location so it can be easily cleaned as
well as provide additional support to reduce wire vibrations.