STARTING PEN DESIGN
-- Part 3
by
Bruce Gabrielson
Tikiline Beagles
 In part 2 of this series we concentrated on basic pen design approaches including the proper use of drainage and cover.
This final part of the series will deal with fence design and installation (how you actually put the fence up).
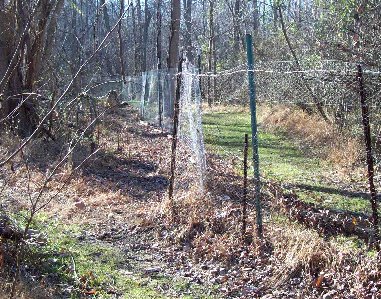
I'm starting with the section of brush shown in Picture #1 (left). It's heavy with branches and undergrowth, plus thick with poison ivy.
In part 2 of this series we concentrated on basic pen design approaches including the proper use of drainage and cover.
This final part of the series will deal with fence design and installation (how you actually put the fence up).
I'm starting with the section of brush shown in Picture #1 (left). It's heavy with branches and undergrowth, plus thick with poison ivy.
Clear it Out
The first thing I'm going to do is clear out all the heavy underbrush except in selected patches where my brush piles will go. This includes spraying to remove poison ivy or any other non-wanted brush. I find that clearing brush after the leaves have fallen in the fall is much easier then in the summer when the underbrush is a tangled mess. I put in my paths in the winter but wait until spring to plant clover and grass before I'm ready to fence.
Make it Simple
How often have you been listening when someone said "make it simple stupid?" Truer words were never spoken when it
comes to putting up your own fence. I don't have the money to pay a crew to clear my property and put up my fences
(a requirement with chain link), so anything that goes up around here is usually on my own with occasional help from my sons.
What this means is I need to do a lot of chain saw and clearing work. Next, I need to figure out how to put my posts in
vertically and without too many bends, string barbed wire close to the top of the posts,
get mesh wire bales from my truck to the post line, roll the wire along the posts without
falling, get the wire attached to the posts without drooping, and finally, ensure the apron is anchored to the ground so rabbits
won't crawl or dig underneath.
The Postline
Once your area is ready, the post line goes up. I highly recommend you draw your lines and mark you post locations first using a string and chalk dust. This will help for straighter lines, and also work to prevent bulges should you have uneven ground or require any fence curves.
In previous parts of this series I described the rational behind selecting your post type and the spacing required for each. In my case, I've chosen to use the heavier 7 ft steel fence posts as with the wire lipped in an
apron as depicted in Picture #2 (right) with an approximate 8 ft spacing for my fence wire type.
 Steel posts are relatively easy to put into the ground on your own by using a step ladder, level, hammer and small sledge hammer. I start the post as straight as I can using the regular hammer. Once it's in about 5", I straighten it using the level, then pound about 4 more inches with the sledge.
 The next picture (Pic #3 left) shows a stretch of 7' steel lug T-posts that have been pounded into the ground on another part of the gorunds.
I prefer to use lug type posts because I have a tool for attaching wire brackets but I think the type of posts with small catches for wire are easier to use.
Notice the pathway on each side of the fence line that I've allowed enough room for a path along each side of the fence line.
I try to keep the path wide enough that I can get my lawn tractor through to keep grass short during the summer months.
The next picture (Pic #3 left) shows a stretch of 7' steel lug T-posts that have been pounded into the ground on another part of the gorunds.
I prefer to use lug type posts because I have a tool for attaching wire brackets but I think the type of posts with small catches for wire are easier to use.
Notice the pathway on each side of the fence line that I've allowed enough room for a path along each side of the fence line.
I try to keep the path wide enough that I can get my lawn tractor through to keep grass short during the summer months.
Regardless of your choice or post, pound the posts into the ground so the dirt just covers the lower T on the post. This will firmly anchor the post plus allow you to dig it up for removal should you decide to change your
fence location later on.
Fencing
Picture #4 (below) shows a typical section of fence extending 5+ ft high with a 6" apron. When you use heavy fence wire, you need to attach a separate apron along the entire bottom section.
I've used a 150' long roll of 1" mesh by 3' high in the past. Take your saw with a close cut blade and saw the roll into three approximate 1' high each sections. These can be rolled out on the ground along the fence line and either attached using either thinner wire, or a wire pliers tool and metal links if you have one. My pliers are quickly loaded with a small metal link and then pushed over each wire to attach with a squeeze. I strongly recommend you get one of these pliers if you plan to maintain your own pen.
 There is a simpler way of creating an apron if you use more flexible wire. In my case, I use 1" galvanized heavier wire netting in 100' long 6' high rolls. The rolls aren't overly heavy so I can unload directly from my truck to the trailer on my riding mower, then haul the roll directly to the fence location. Some folks use the lighter wire because it's more flexible and easier to install. My biggest problem with the lighter wire is that it rusts quickly and needs to be replaced every other year. What I have done with the lighter wire netting is use it for repairs when a tree or branch goes down over the fence, or when a deer decides to tear my fence down. This happens on a regular basis and represents a lot of work to keep your rabbits inside the pen. Light wire can be quickly hauled to the down fence area and then be rolled out across the hole with minimal work. Heavier fencing sometimes requires me to cut the damaged fence out while the lighter wire bends around uneven spots for an easy repair.
I also have a serious problem with vines growing on my fence line and discussed this earlier in this series. Spraying vines on a regular basis prevents fence rust. Also of importance in laying down your fence and apron is to make sure the fence is easily accessible on both sides with a pathway (see the figure above). You need to ensure the apron doesn't stick out into the path so far that your mowing blade will catch it when you drive by.
For an apron, only put the fence about 5 ˝ feet high or less and then bend a crease along the bottom part of the wire for the apron. Using this approach, you slowly build up the apron material over the years while at the same time creating multiple layers of new and older fencing.
Apron Hold Downs
One problem I used to have is figuring out how to hold my aprons down. One of the things I noticed when building or maintaining my brush piles is how many fairly
straight 4' to 5' long and 2 1/2" across or more poles I end up with when I cut down trees and branches. I used to constantly
go to my brush piles to find a log to hold down my aprons. Now I plan for using the poles and these have worked very well.
One important point to note is that the lighter poles work best along flat ground while heavier cut tree trunks work better
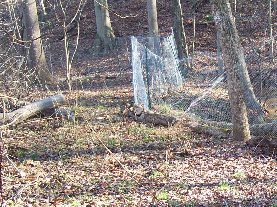
where the ground is uneven or slopes. Picture #5 (right) shows part of the apron on my fence line with poles holding it down.

There are some areas along my fence where the ground is too uneven for a light pole to hold the apron down well. I also have a
problem near gates where pups want to congregate and where they often try to dig out. In these areas, I often need to place a flat board or heavier log to keep the fence tight to the
ground and to prevent pups from pushing the board of log out of the way.
Gates
Regarding gates, I have concrete poles with swinging gates, plus heavy reinforced wire
along the bottom half of the wire near the gate. Not only do pups congregate, but they spend a lot of time jumping
against the wire near the gate. After replacing wire sections a few times, I put a post immediately next to the gate post.
The added support prevents the wire from sagging a
much, plus replacing the section only requires a small piece of wire.
I kept pups out of my pen for a couple of days so the rabbits could adjust to their newly added pen area. First time into the
area I jumped a rabbit about 20 ft inside the new area near the fence line. In the fall or spring when there has been a lot of rain but the grass and
clover mix I planted hadn't come up yet rabbits will still move into the area quickly.
This implies the rabbits must like their new areas despite the lack or feed so far.
All articles are the copyrighted
property of the author